Embedded Rust Serial
How to use the UART peripheral in embedded Rust
The UART/USART is one of the most ubiquitously used peripherals in embedded device’s and serves the purpose of establishing communication between different devices. In the post we will look at how we can use the UART to communicate with our computer.
We will go through a few different types of serial communcation and see what the pros and cons of each are. Let’s start our with the easiest to implement, we’ll also take a look at a new crate heapless so we can use versions of some of the familiar types of containers that we’re used to like String and Vec.
I’ll be using the NUCLEO-L476RG board which has a built in ST-Link programmer that exposes the USART2 peripheral as a COM PORT. We will setup the project the same way we did in the other posts with this basic skeleton:
#![no_std]
#![no_main]
use cortex_m_rt::entry;
use panic_halt as _;
use stm32l4xx_hal::{delay::Delay, pac, prelude::*};

#[entry]
fn main() -> ! {
    // Get a singleton to the peripherals of our device
    let p = pac::Peripherals::take().unwrap();
    // Get a singleton to the CorePeripherals of our device. Coreperipherals differ from Peripherals
    // the CorePeripherals are common to the cortex-m family.
    let cp = stm32l4xx_hal::device::CorePeripherals::take().unwrap();
    // From my understanding the constrain method works to provide different methods from the HAL on each of it's members
    let mut flash = p.FLASH.constrain();
    // Acquire clock control handle
    let mut rcc = p.RCC.constrain();
    // Acquire power control handle
    let mut pwr = p.PWR.constrain(&mut rcc.apb1r1);
    // Set the system clock and the peripheral clocks and enables them via freeze.
    let clocks = rcc
        .cfgr
        .sysclk(80.MHz())
        .pclk1(80.MHz())
        .pclk2(80.MHz())
        .freeze(&mut flash.acr, &mut pwr);
    // On our board the LED is tied to the PA5 pin. So we will need to get access to the GPIO A bank
    // The registers for GPIO A are controlled by the AHB2 (Advanced High-performance Bus 2)
    let mut gpioa = p.GPIOA.split(&mut rcc.ahb2);
    // We configure the user_led to be a push pull output.
    let mut user_led = gpioa.pa5.into_push_pull_output(&mut gpioa.moder, &mut gpioa.otyper);
    // We create a delay timer using the SYST peripheral
    let mut timer = Delay::new(cp.SYST, clocks);
    loop {
    }
}
Now we can add in our serial specific code and get to work. I will be using the USART2 peripheral which is tied to the PA2 and PA3 bank of gpios. What we want to do is receive a message of a fixed length and then echo that message back. While i could make this more simple since it is effectively just an echo i think this is a more realistic scenario for simple projects.
    // Configure transmit pin
    let tx = gpioa
                .pa2
                .into_alternate(&mut gpioa.moder, &mut gpioa.otyper, &mut gpioa.afrl);
    // Configure receive pin
    let rx = gpioa
                .pa3
                .into_alternate(&mut gpioa.moder, &mut gpioa.otyper, &mut gpioa.afrl);
    // Create serial peripheral
    let mut serial = serial::Serial::usart2(p.USART2, (tx, rx), 115200.bps(), clocks, &mut rcc.apb1r1);
    // Size of our buffer
    const buff_len: usize = 4;
    // Create buffer
    let mut buff: [u8; buff_len] = [ 0; 4];
    // Create tracker for buffer
    let mut idx: usize = 0;
    loop {
        // Read a character if it's available
        match serial.read() {
            Err(e) => (),
            Ok(c) => {
                // If we got a character add it to our buffer
                buff[idx] = c;
                // If our buffer is the size of our frame process it
                if idx == (buff_len -1) {
                    let mut out_idx = 0;
                    while out_idx < buff_len {
                        // write until successful
                        match serial.write(buff[out_idx]) {
                            Err(e) => (),
                            Ok(()) => out_idx += 1
                        }
                    }
                    // Set tracker to zero
                    idx = 0;
                } else {
                    // Increment tracker
                    idx += 1;
                }
            }
        }
    }
If you want to use a Serial terminal like the arduino IDE has feel free if you just want a simple script to test thing’s out you can use this:
import serial
import time

if __name__ == '__main__':
    ser = serial.Serial("/dev/ttyACM0", 115200)
    idx = 100
    while True:
        if ser.in_waiting:
            data = ser.read(ser.in_waiting)
            print(data.decode(), end="")
            time.sleep(.1)
        else:
            ser.write(f"{idx}\n".encode())
            time.sleep(.1)
            idx += 1
Note: yes i know i should probably just write this in rust, but this is nice and easy
If you run this script you should see the following on the terminal:
❯ python3 serial_writer.py
100
101
102
103
104
105
106
107
108
109
110
111
112
113
114
115
Perfect we get our 4 byte message’s (3 ints, 1 newline) and echo them out. Now let’s do something a little bit more useful with this information let’s change the length of the LED’s on time based on our recevied message. We are sending over ascii numeric values. We could send over raw bytes and process them but dealing with the ascii values gives us a fun little challenge. Ascii is a character encoding standard for electronic communication. ASCII codes represent text in computers.
How do we represent the number 1000 with ascii text? It’s equivalent to the u8 byte array of [31, 30, 30, 30]. There are many methods to decoding this but let’s roll our own for fun:
fn ascii_to_u32(buffer: &[u8]) -> u32 {
    buffer.into_iter()
        .filter_map(|x| char::to_digit(*x as char, 10))
        .rev()
        .enumerate()
        .fold(0 as u32, |acc, (i, j)| acc + ((10_u32.pow(i as u32))*(j as u32)) )
}
Here we parse the value to a digit and if it isn’t valid we filter it out. We then reverse the list and multiply each number by 10^index, and that gives us what we’re looking for. Now let’ see what our main loop will look like:
        match serial.read() {
            Err(e) => (),
            Ok(c) => {
                // If we got a character add it to our buffer
                buff[idx] = c;
                // If our buffer is the size of our frame process it
                if idx == (buff_len -1) {
                    // Get new timeout
                    let new_timeout = ascii_to_u32(&buff);
                    // Set the timeout
                    timeout = new_timeout;
                    // Set new timestamp
                    timestamp = millis();
                    // Format str with the parsed value just so we can be sure and send it
                    write!(serial, "{}\n", new_timeout);
                    // Set tracker to zero
                    idx = 0;
                } else {
                    // Increment tracker
                    idx += 1;
                }
            }
Just to make things a little more noticeable we can change our python script to go to a higher value as well. The next thing we might want to do is not depend on a fixed length set of packets being sent what if we want to send 1000000 or 1. We can approach this in a few different ways. We could wait for an IDLE line timeout period or we can just wait for a specific character or character sequence. In practice a newline or carriage return is often sent respectively, ‘\n’, ‘\r’ or they may be both sent \r\n. Of course there’s still a limit to the size of the buffer that we allocate so we can’t accept arbitrarily large numbers but let’s cap it at 999999999.
    // Size of our buffer
    const buff_len: usize = 9;
    // Create buffer
    let mut buff: [u8; buff_len] = [ 0; buff_len];
    // Create tracker for buffer
    let mut idx: usize = 0;
    // Get Curent Time
    let mut timestamp = millis();
    // Set a timeperiod to elapse
    let mut timeout: u32 = 1000;
    loop {
        // Read a character if it's available
        match serial.read() {
            Err(_e) => (),
            Ok(c) => {
                // If our buffer is the size of our frame process it or if we receive a new line
                if c == ('\n' as u8) || idx == (buff_len - 1) {
                    // Get new timeout
                    let new_timeout = ascii_to_u32(&buff[0..idx]);
                    // Set the timeout
                    timeout = new_timeout;
                    // Set new timestamp
                    timestamp = millis();
                    // Format str with the parsed value just so we can be sure and send it
                    write!(serial, "{}\n", new_timeout);
                    // Set tracker to zero
                    idx = 0;
                } else {
                    buff[idx] = c;
                    // Increment tracker
                    idx += 1;
                }
            }
        }
        if (millis() - timestamp) > timeout {
            user_led.toggle();
            timestamp = millis();
        }
    }
We change our buff_len variable to be 9 and we add one extra check to our character match to see if c == ‘\n’ and that’s it. If you wanted to try an even better but more complicated apporach you can try to implement the classic ring buffer receiver.
Now let’s say we wanted to handle all our serial communication inside an interrupt handler. How would we do this? Well it’s not all that much of a change. Let’s see what event’s we have available.
pub enum Event {
    Rxne,
    Txe,
    Idle,
    CharacterMatch,
    ReceiverTimeout,
}
...
Rxne
  New data has been received
Txe
  New data can be sent
Idle
  The line has gone idle
CharacterMatch
  Character match
ReceiverTimeout
  Receiver timeout
The Event we want to handle first is the Rxne (new data available). Let’s take a stab at that. First we change the imports
use stm32l4xx_hal::{
    delay::Delay,
    pac::{self, TIM2, USART2},
    interrupt,
    prelude::*,
    serial::{self, Serial},
    stm32,
    timer::{Timer, Event},
    gpio::{ gpioa::{PA2, PA3}, Alternate, PushPull }
};
Next let’s get global access to the serial handle:
static SERIAL: Mutex<
    RefCell<Option<Serial<USART2, (PA2<Alternate<PushPull, 7>>, PA3<Alternate<PushPull, 7>>)>>>,
> = Mutex::new(RefCell::new(None));
Let’s also introduce ourselves to the heapless crate. We could of course have a global variable [u8; N] and then another global AtomicUsize to track it’s position, but using Vec gives us a lot of the methods were familiar with from std and avoids us needing to deal with two variables. There’s also a ton of other useful data structures in the heapless crate that you should check out.
$ cargo add heapless...
use heapless;
...
// Declare Global for Message
static BUFFER: Mutex<RefCell<Vec<u8, 100>>> = Mutex::new(RefCell::new(Vec::new()));And our interrupt will look like this:
// Declare the timer interrupt
#[interrupt]
fn USART2() {
    free(|cs| {
        // Get serial reference
        let mut ser_ref = SERIAL.borrow(cs).borrow_mut();
        if let Some(ref mut ser) = ser_ref.deref_mut() {
            // Read from serial
            if let Ok(c) = ser.read() {
                // Get message reference
                let mut msg_ref = BUFFER.borrow(cs).borrow_mut();
                let mut msg = msg_ref.deref_mut();
                // Check for newline if not then push to the buffer and if
                // the push exceeds the size of the buffer we process the message
                if (c as char) == '\n' || !msg.push(c).is_ok() {
                   // Set flag to process message
                   MESSAGE_RECEIVED.store(true, Ordering::Relaxed)
                } else {
                   // reset interrupt
                   ser.listen(stm32l4xx_hal::serial::Event::Rxne);
                }
            }
        }
    });
}
Our main loop will process the buffer whenever message received is set to true and then reset it to false.
        if MESSAGE_RECEIVED.load(Ordering::Relaxed) {
            free(|cs| {
                // Get serial reference
                let mut ser_ref = SERIAL.borrow(cs).borrow_mut();
                if let Some(ref mut ser) = ser_ref.deref_mut() {
                    // Get message reference
                    let mut msg_ref = BUFFER.borrow(cs).borrow_mut();
                    let mut msg = msg_ref.deref_mut();
                    let new_timeout = ascii_to_u32(msg.as_slice());
                    timeout = new_timeout;
                    timestamp = millis();
                    // Format str with the parsed value just so we can be sure and send it
                    write!(ser, "{}\n", new_timeout);
                    // Clear old message
                    msg.clear();
                    // Reinitiate listening for interrupts
                    ser.listen(stm32l4xx_hal::serial::Event::Rxne);
                }
            });
            MESSAGE_RECEIVED.store(false, Ordering::Relaxed);
        }
And the final code looks like this:
#![no_std]
#![no_main]
use core::borrow::BorrowMut;
use core::cell::RefCell;
use core::ops::DerefMut;
use core::sync::atomic::{AtomicU32, Ordering, AtomicBool};
use core::{
    fmt::{Arguments, Write},
    format_args,
};
use cortex_m::{
    interrupt::{free, Mutex},
    peripheral::NVIC,
};
use cortex_m_rt::entry;
use panic_halt as _;
use stm32l4xx_hal::{
    delay::Delay,
    gpio::{
        gpioa::{PA2, PA3},
        Alternate, PushPull,
    },
    interrupt,
    pac::{self, TIM2, USART2},
    prelude::*,
    serial::{self, Serial},
    stm32,
    timer::{Event, Timer},
};
use heapless::{Vec};

// Declare a global that we will access inside of our timer interrupt
static TIM: Mutex<RefCell<Option<Timer<TIM2>>>> = Mutex::new(RefCell::new(None));
// Declare global for millis variable
static MILLIS: AtomicU32 = AtomicU32::new(0);
// Declare Global for Message Received
static MESSAGE_RECEIVED: AtomicBool = AtomicBool::new(false);
// Declare Global for Serial
static SERIAL: Mutex<
    RefCell<Option<Serial<USART2, (PA2<Alternate<PushPull, 7>>, PA3<Alternate<PushPull, 7>>)>>>,
> = Mutex::new(RefCell::new(None));
// Declare Global for Message
static BUFFER: Mutex<RefCell<Vec<u8, 100>>> = Mutex::new(RefCell::new(Vec::new()));


//Declare the timer interrupt
#[interrupt]
fn TIM2() {
    // Run the critical section code
    free(|cs| {
        // Get the timer refernce and clear then event timeout so it isn't
        // triggered immediately
        let mut tim_ref = TIM.borrow(cs).borrow_mut();
        if let Some(ref mut tim) = tim_ref.deref_mut() {
            // Get the timer refernce and clear then event timeout so it isn't
            // triggered immediately
            tim.clear_interrupt(Event::TimeOut);
            // Add one to the millis count
            MILLIS.fetch_add(1, Ordering::SeqCst);
        }
    });
}

// Declare the timer interrupt
#[interrupt]
fn USART2() {
    free(|cs| {
        // Get serial reference
        let mut ser_ref = SERIAL.borrow(cs).borrow_mut();
        if let Some(ref mut ser) = ser_ref.deref_mut() {
            // Read from serial
            if let Ok(c) = ser.read() {
                // Get message reference
                let mut msg_ref = BUFFER.borrow(cs).borrow_mut();
                let mut msg = msg_ref.deref_mut();
                // Check for newline if not then push to the buffer and if
                // the push exceeds the size of the buffer we process the message
                if (c as char) == '\n' || !msg.push(c).is_ok() {
                   // Set flag to process message
                   MESSAGE_RECEIVED.store(true, Ordering::Relaxed)
                } else {
                   // reset interrupt
                   ser.listen(stm32l4xx_hal::serial::Event::Rxne);
                }
            }
        }
    });
}

fn millis() -> u32 {
    MILLIS.load(Ordering::SeqCst)
}

fn ascii_to_u32(buffer: &[u8]) -> u32 {
    buffer
        .into_iter()
        .filter_map(|x| char::to_digit(*x as char, 10))
        .rev()
        .enumerate()
        .fold(0 as u32, |acc, (i, j)| {
            acc + ((10_u32.pow(i as u32)) * (j as u32))
        })
}

#[entry]
fn main() -> ! {
    // Get a singleton to the peripherals of our device
    let p = pac::Peripherals::take().unwrap();
    // Get a singleton to the CorePeripherals of our device. Coreperipherals differ from Peripherals
    // the CorePeripherals are common to the cortex-m family.
    let cp = stm32l4xx_hal::device::CorePeripherals::take().unwrap();
    // From my understanding the constrain method works to provide different methods from the HAL on each of it's members
    let mut flash = p.FLASH.constrain();
    // Acquire clock control handle
    let mut rcc = p.RCC.constrain();
    // Acquire power control handle
    let mut pwr = p.PWR.constrain(&mut rcc.apb1r1);
    // Set the system clock and the peripheral clocks and enables them via freeze.
    let clocks = rcc
        .cfgr
        .sysclk(80.MHz())
        .pclk1(80.MHz())
        .pclk2(80.MHz())
        .freeze(&mut flash.acr, &mut pwr);
    // On our board the LED is tied to the PA5 pin. So we will need to get access to the GPIO A bank
    // The registers for GPIO A are controlled by the AHB2 (Advanced High-performance Bus 2)
    let mut gpioa = p.GPIOA.split(&mut rcc.ahb2);
    // We configure the user_led to be a push pull output.
    let mut user_led = gpioa
        .pa5
        .into_push_pull_output(&mut gpioa.moder, &mut gpioa.otyper);
    // Unmask the TIM2 interrupt to allow the interrupt to trigger
    unsafe {
        NVIC::unmask(stm32::Interrupt::TIM2);
        NVIC::unmask(stm32::Interrupt::USART2);
    }
    // Setup a timer
    let mut ms_timer = Timer::tim2(p.TIM2, 1000.Hz(), clocks, &mut rcc.apb1r1);
    // Listen for the timeout (overflow) event
    ms_timer.listen(Event::TimeOut);
    // Place the references into their global variables
    // Configure transmit pin
    let tx = gpioa
        .pa2
        .into_alternate(&mut gpioa.moder, &mut gpioa.otyper, &mut gpioa.afrl);
    // Configure receive pin
    let rx = gpioa
        .pa3
        .into_alternate(&mut gpioa.moder, &mut gpioa.otyper, &mut gpioa.afrl);
    // Create serial peripheral
    let mut serial =
        serial::Serial::usart2(p.USART2, (tx, rx), 115200.bps(), clocks, &mut rcc.apb1r1);
    // Listen for interrupt on reception
    serial.listen(stm32l4xx_hal::serial::Event::Rxne);
    // Size of our buffer
    const buff_len: usize = 9;
    // Create buffer
    let mut buff: [u8; buff_len] = [0; buff_len];
    // Create tracker for buffer
    let mut idx: usize = 0;

    // Get Curent Time
    let mut timestamp = millis();
    // Set a timeperiod to elapse
    let mut timeout: u32 = 1000;

    free(|cs| {
        TIM.borrow(cs).replace(Some(ms_timer));
        SERIAL.borrow(cs).replace(Some(serial));
    });
    loop {
        // Check for received message
        if MESSAGE_RECEIVED.load(Ordering::Relaxed) {
            free(|cs| {
                // Get serial reference
                let mut ser_ref = SERIAL.borrow(cs).borrow_mut();
                if let Some(ref mut ser) = ser_ref.deref_mut() {
                    // Get message reference
                    let mut msg_ref = BUFFER.borrow(cs).borrow_mut();
                    let mut msg = msg_ref.deref_mut();
                    let new_timeout = ascii_to_u32(msg.as_slice());
                    timeout = new_timeout;
                    timestamp = millis();
                    // Format str with the parsed value just so we can be sure and send it
                    write!(ser, "{:?}\n", new_timeout);
                    // Clear old message
                    msg.clear();
                    // Reinitiate listening for interrupts
                    ser.listen(stm32l4xx_hal::serial::Event::Rxne);
                }
            });
            MESSAGE_RECEIVED.store(false, Ordering::Relaxed);
        }

        if (millis() - timestamp) > timeout {
            user_led.toggle();
            timestamp = millis();
        }
    }
}
Now that we’ve gotten that taken care of let’s look at using the DMA interface on our chip we will do this two different ways. First we will wire up the DMA without using the HAL so that we can see how the peripheral is configured and then we will look at setting up DMA transfers using the FrameSender and FrameReceiver interface’s. An important note to those using boards that are not in the stm32l4 family. There’s a chance that your crate will not provide the FrameSender and FrameReceiver interfaces.
First the hand wiring and i’d like to preface this by saying you should not follow this example in your own code use a battle tested interface, i am using it to illustrate the configuration of the DMA register for those unfamiliar.
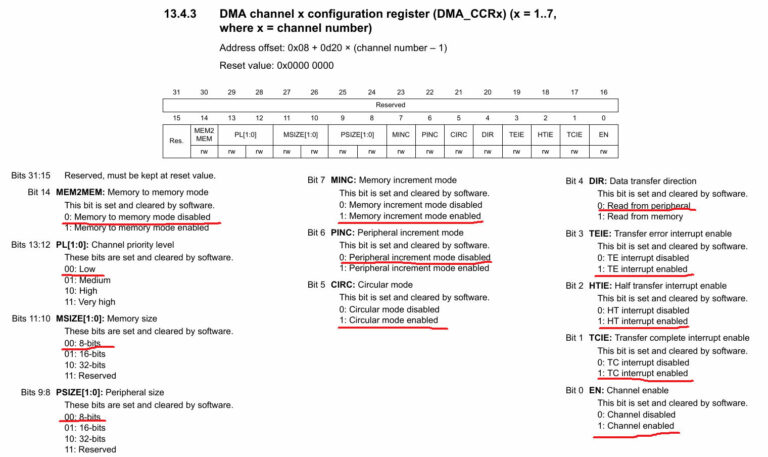
The DMA Configuration Register contains the following fields:
| Name | Bits | Description |
|---|---|---|
| RESERVED | 31:15 | |
| MEM2MEM | 14 | Memory to Memory Mode |
| PL | 13:12 | Priority Level |
| MSIZE | 11:10 | Data size of each dma transfer |
| PSIZE | 9:8 | Peripheral Size |
| MINC | 7 | Memory Increment Mode |
| PINC | 6 | Peripheral Increment Mode |
| CIRC | 5 | Circular Mode |
| DIR | 4 | Data Transfer Direction |
| TEIE | 3 | Transfer Error Interrupt Enable |
| HTIE | 2 | Half Transfer Complete Interrupt Enable |
| TCIE | 1 | Transfer Complete Interrupt Enable |
| EN | 0 | Enable |
Work In progress